

Streamline Terraform-AWS Development with Dev Containers in GitHub Codespaces
Learn how to improve your Terraform-AWS workflow with Dev Containers in GitHub Codespaces for better development speed and collaboration.


In my previous post, I explained how to set up your Codespace for Terraform on AWS manually. If you're planning to work with multiple repositories using the same setup, you can use "Dev containers".
"Dev containers" (Development containers) are Docker containers tailored to provide comprehensive development environments. When working in a Codespace, you're essentially using a dev container on a virtual machine. These containers can be configured for specific repositories, ensuring Codespaces offer a customized environment with all necessary tools and runtimes for the project.
In this post, I'll leverage Dev containers to create a basic development environment in Codespace for a Terraform-AWS repository. This setup includes:
AWS access keys for AWS CLI
Terraform VS Code extension
AWS CLI
Terraform CLI
First, I'll cover setting up AWS access keys and the Terraform VS Code extension for a dev container. Then, I'll detail three methods for installing AWS CLI and Terraform CLI:
"postCreateCommand" property of Dev container
Dev containers features
Custom Dockerfile [Recommended 👍]
By following these steps, you'll be ready to apply it to your real-world Terraform for AWS projects on Codespace.
Let's get started! 🚀
Define AWS access keys on Dev Container 🔑
AWS access keys are credentials comprising an access key ID and secret access key. We utilize them to grant access for AWS CLI to manage AWS resources on our AWS account from our Codespace environment.
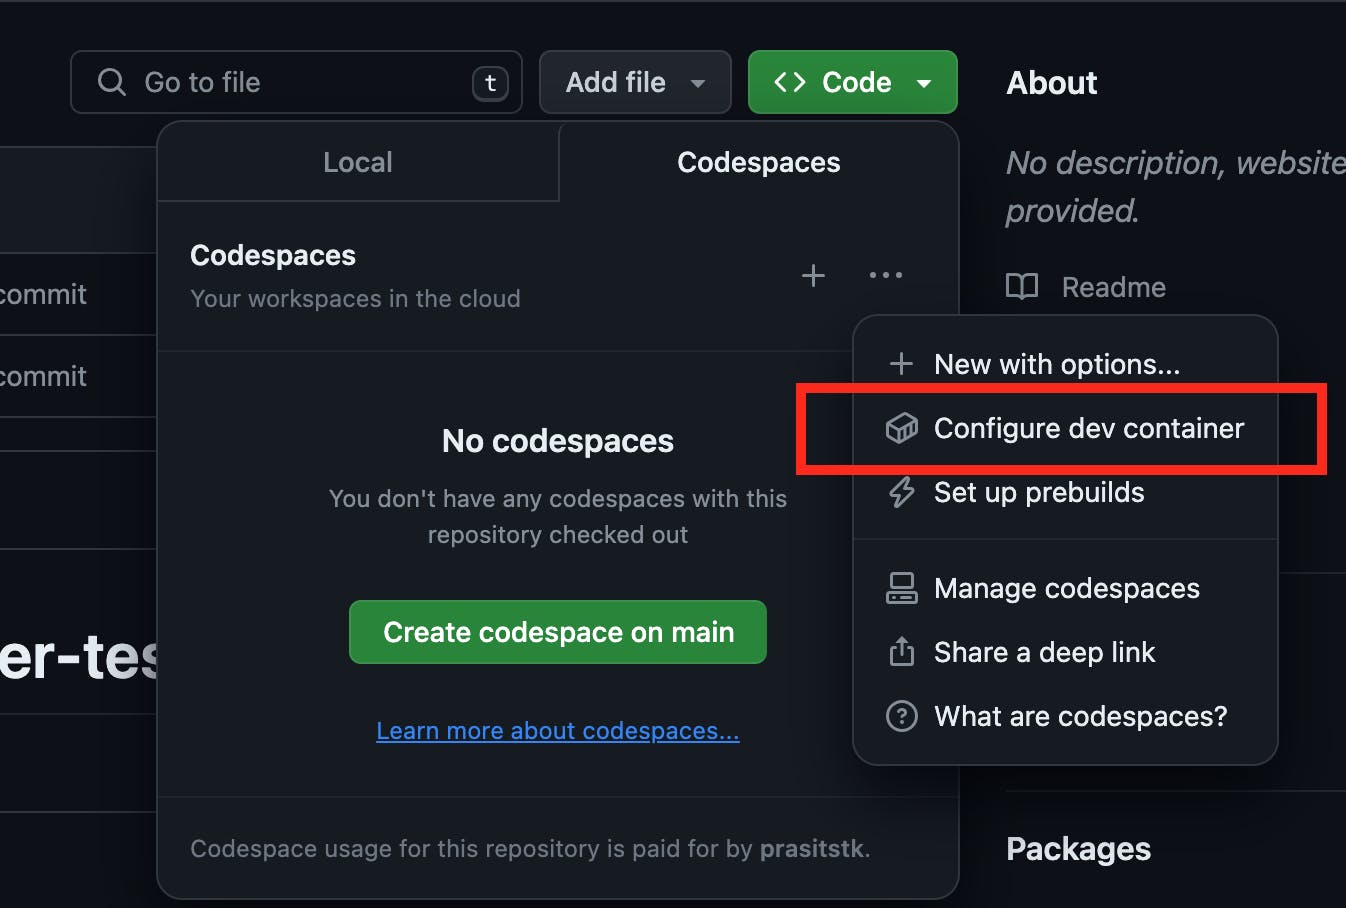
To begin, log in to your GitHub account and navigate to the Terraform-AWS repository where you wish to set up a dev container. Next, click the "Code" button, choose the "Codespaces" tab, and select the ellipsis icon "...". From the dropdown menu, opt for "Configure dev container" as illustrated below:
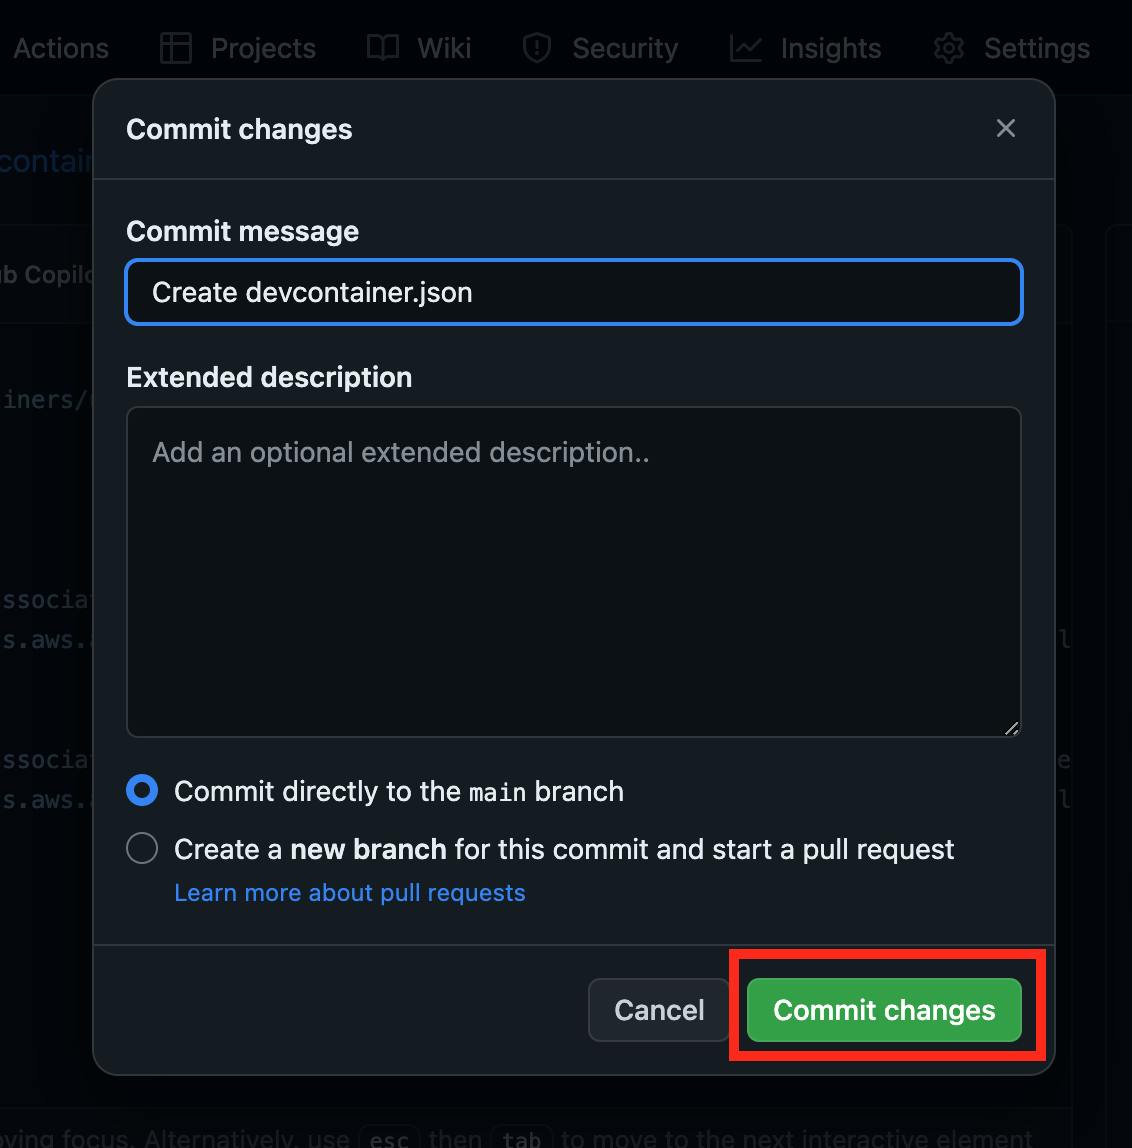
After that, GitHub will try to create a new directory .devcontainer and a new file inside devcontainer.json. The configuration files for a dev container are contained in a .devcontainer directory in your repository and devcontainer.json is the primary one. Define the "recommended" personal secrets by adding "secrets" property into this JSON file as follows:
{
  "image": "mcr.microsoft.com/devcontainers/universal:2",
  "features": {
  },
  // ADDED //
  "secrets": {
    "AWS_ACCESS_KEY_ID": {
      "description": "AWS access key associated with an IAM user or role.",
      "documentationUrl": "https://docs.aws.amazon.com/cli/latest/userguide/cli-configure-envvars.html#envvars-list"
    },
    "AWS_SECRET_ACCESS_KEY": {
      "description": "the secret key associated with the access key (AWS_ACCESS_KEY_ID). This is essentially the password for that access key.",
      "documentationUrl": "https://docs.aws.amazon.com/cli/latest/userguide/cli-configure-envvars.html#envvars-list"
    }
    ///////////
  }
}
Proceed by clicking the "Commit changes..." button, entering the commit message, and confirming the changes by clicking "Commit changes":
It's worth noting that AWS access keys are not directly defined in the Dev container configuration files but are "recommended" instead. Users must create these secrets in their personal Codespaces settings. If not, the "secrets" property will prompt them to do so when using the advanced options method to create a Codespace as follows:

Then the names of the recommended secrets are only listed on the below page when the dev container configuration on the selected branch specifies these secrets.
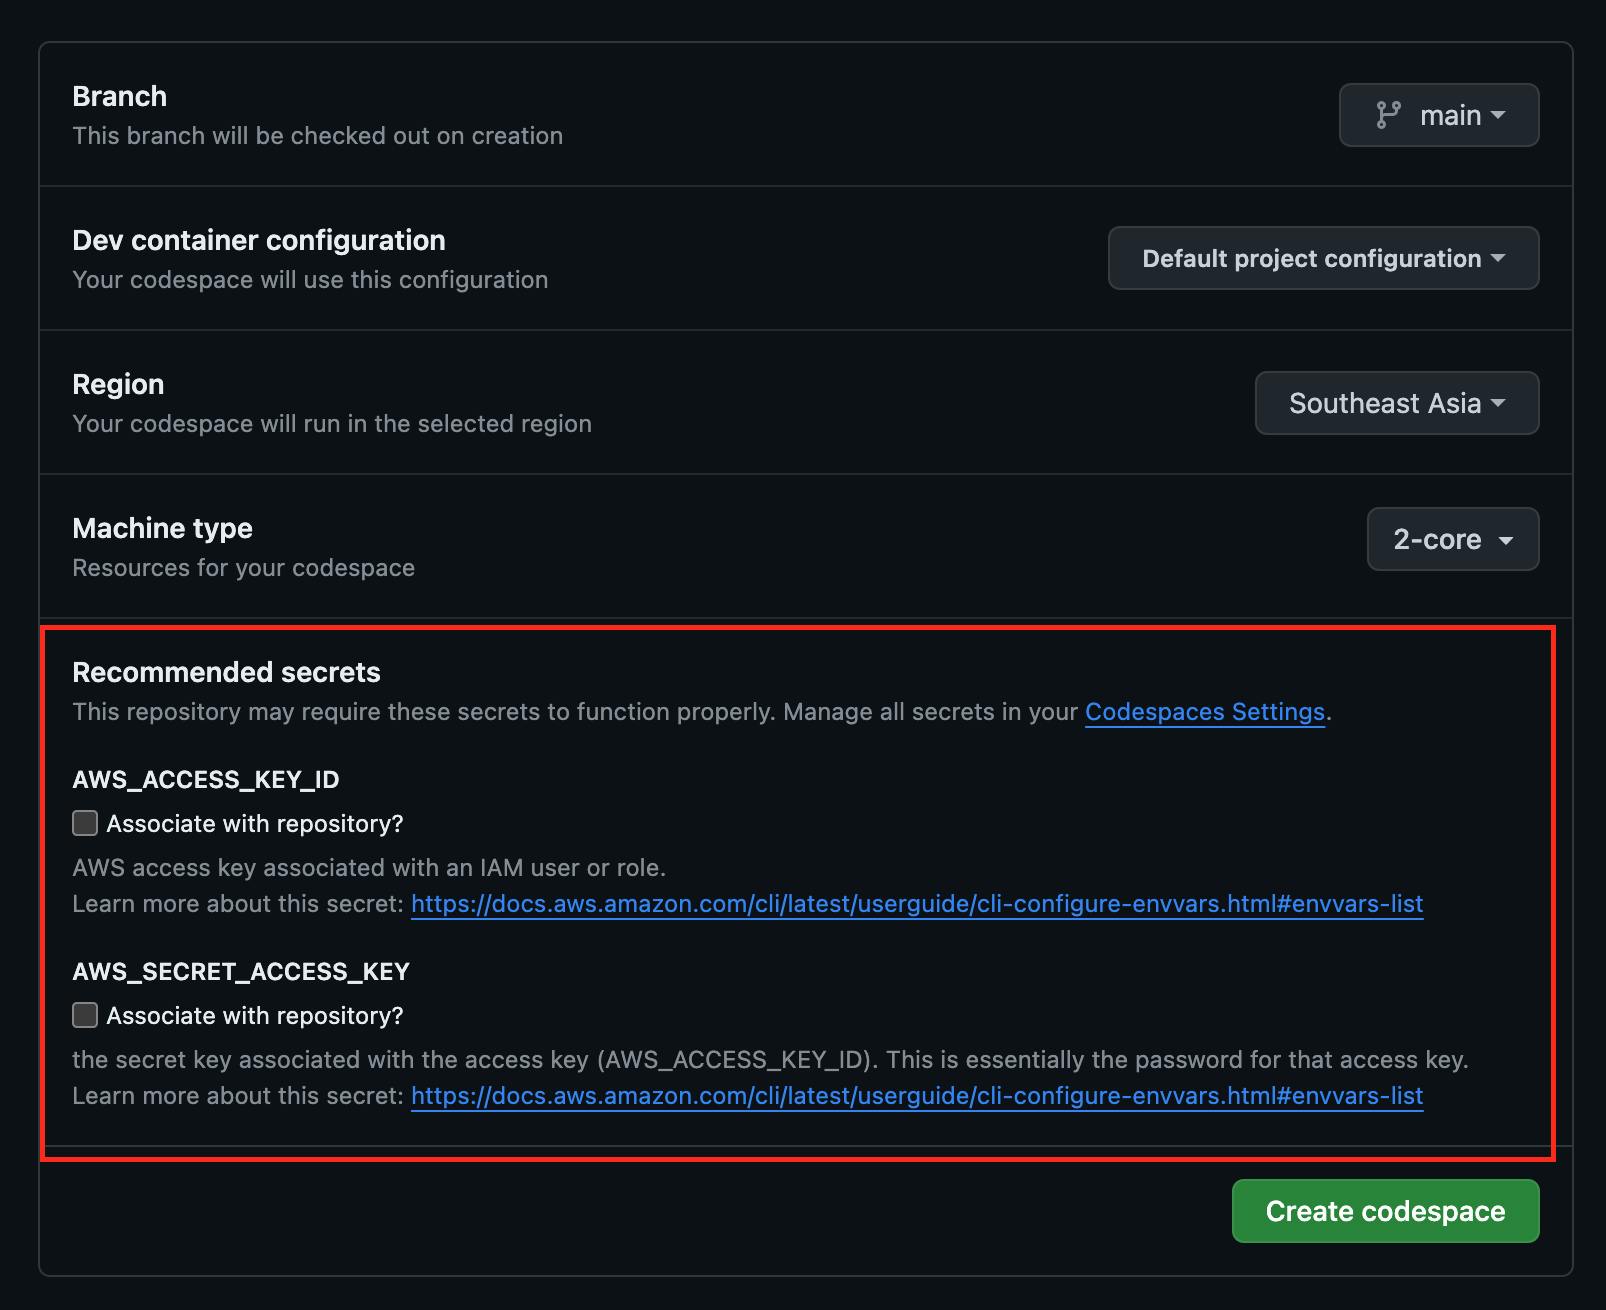
By selecting "Associate with repository?" for certain secrets and clicking "Create codespace", these secrets will be added to your personal Codespaces settings, along with creating a new codespace. Navigate to your GitHub account's personal settings page, select "Codespaces" from the left-hand menu, and you'll find the two secrets automatically created under "Codespaces secrets":
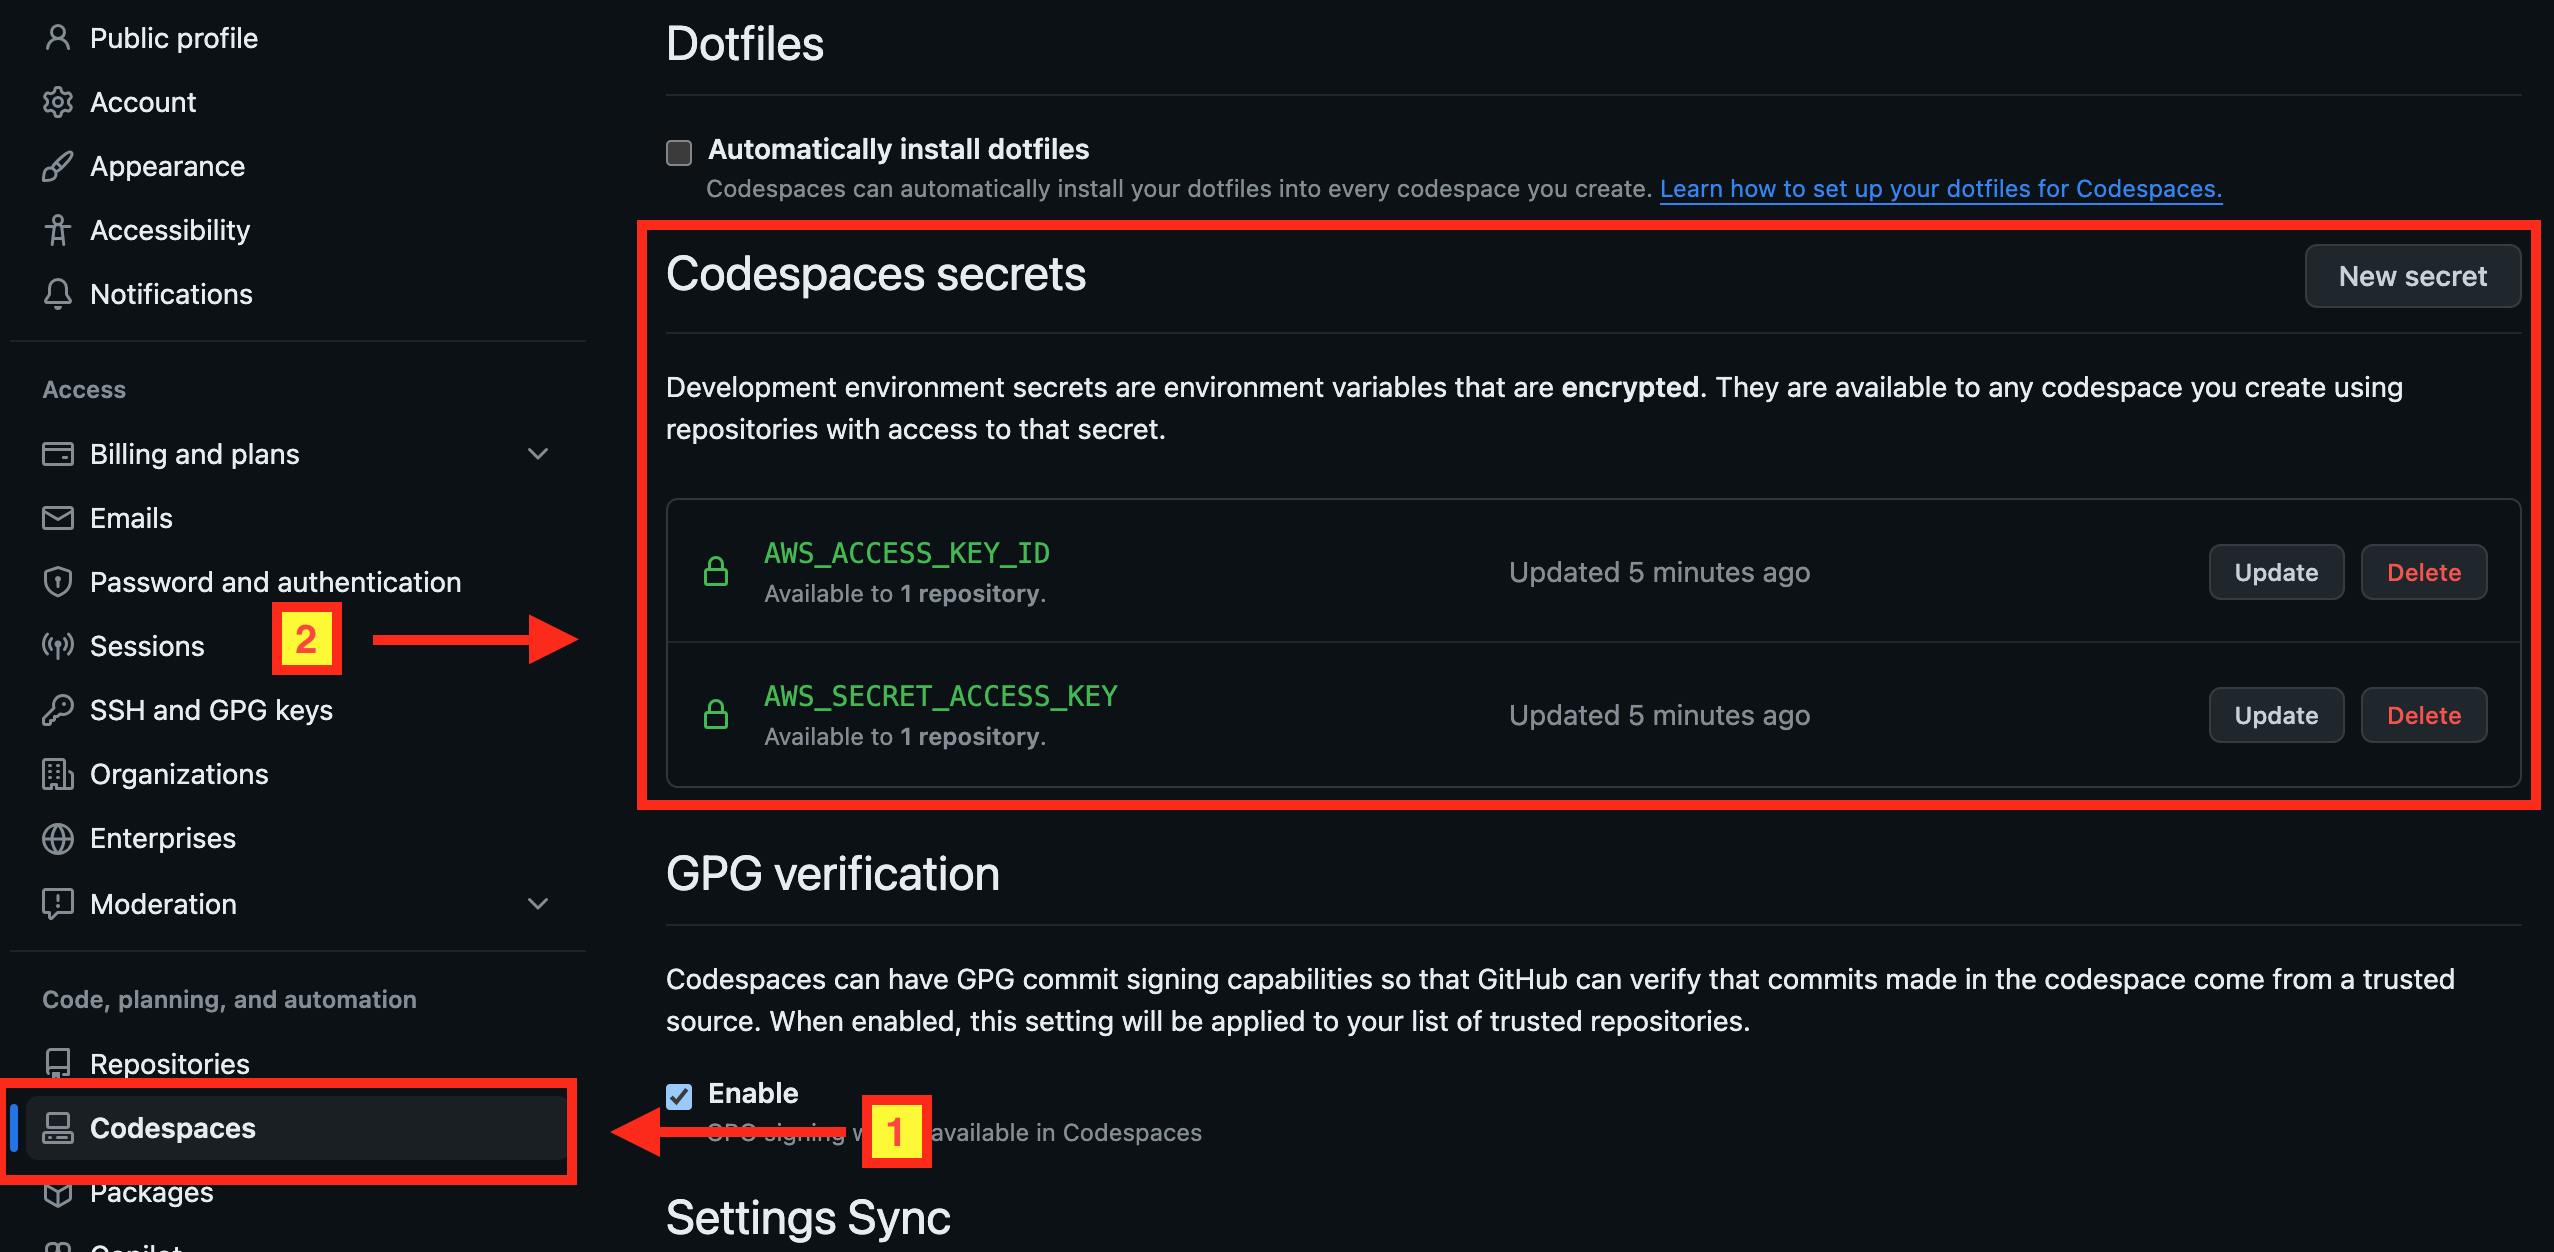
Update each secret by pasting your AWS access keys and clicking "Save changes." These secrets won't be available as environment variables until you click "Reload to apply" button on the dialog box that just appears below your codespace:

Once AWS access keys from your Codespaces secrets are confirmed, verify their presence using the echo command:

Your AWS access keys should now appear in the VS Code Terminal on Codespace. With AWS CLI installed, it will utilize these keys to manage your AWS resources accordingly.
Define Terraform VS Code extension on Dev Container 🧩
On the step 8 in my previous post, I demonstrated manual installation of the Terraform extension for VS Code. However, you can streamline this process by defining it directly in the devcontainer.json configuration file. Here's how:
Add the "customizations" property to your devcontainer.json file:
{
  "image": "mcr.microsoft.com/devcontainers/universal:2",
  "features": {
  },
  "secrets": {
    "AWS_ACCESS_KEY_ID": {
      "description": "AWS access key associated with an IAM user or role.",
      "documentationUrl": "https://docs.aws.amazon.com/cli/latest/userguide/cli-configure-envvars.html#envvars-list"
    },
    "AWS_SECRET_ACCESS_KEY": {
      "description": "the secret key associated with the access key (AWS_ACCESS_KEY_ID). This is essentially the password for that access key.",
      "documentationUrl": "https://docs.aws.amazon.com/cli/latest/userguide/cli-configure-envvars.html#envvars-list"
    }
  },
  // ADDED //
  "customizations": {
    "vscode": {
      "extensions": ["hashicorp.terraform"]
    }
  }
  ///////////
}
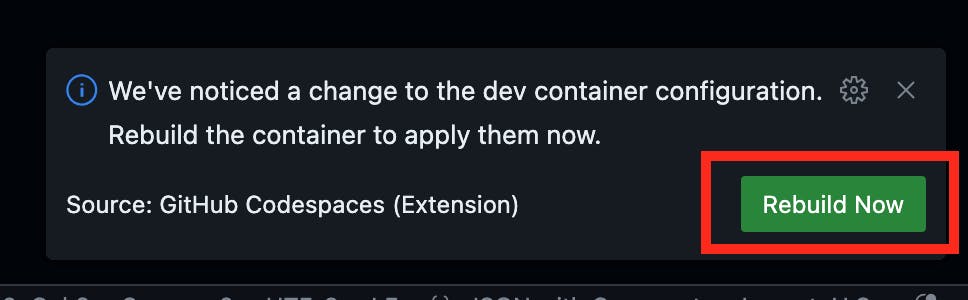
After adding the property, you'll see a dialog appear. Click "Rebuild now" to proceed:
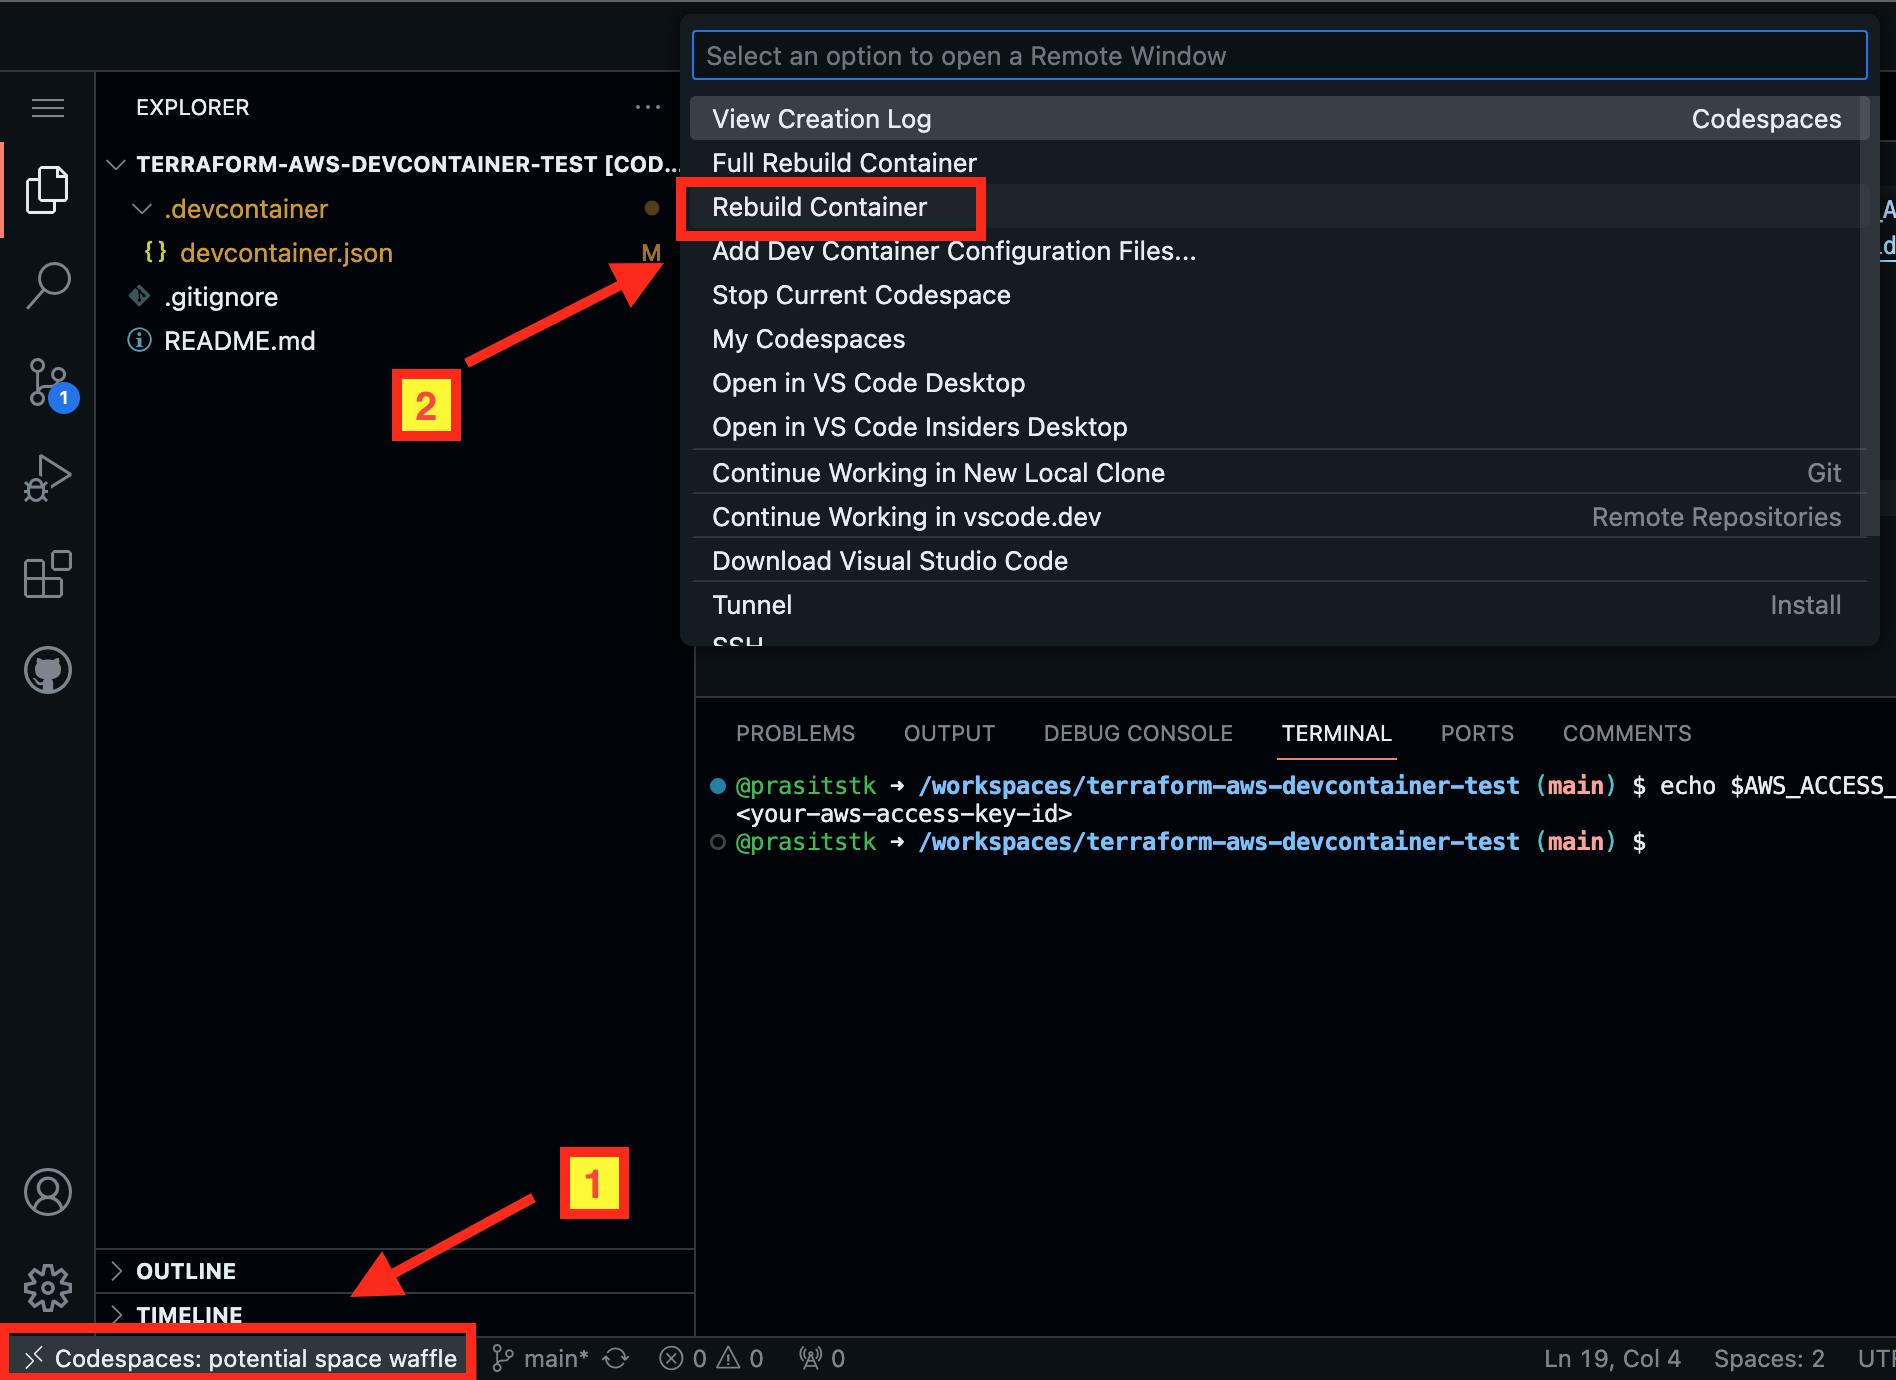
Alternatively, you can select "Rebuild Container" from the menu as follows:
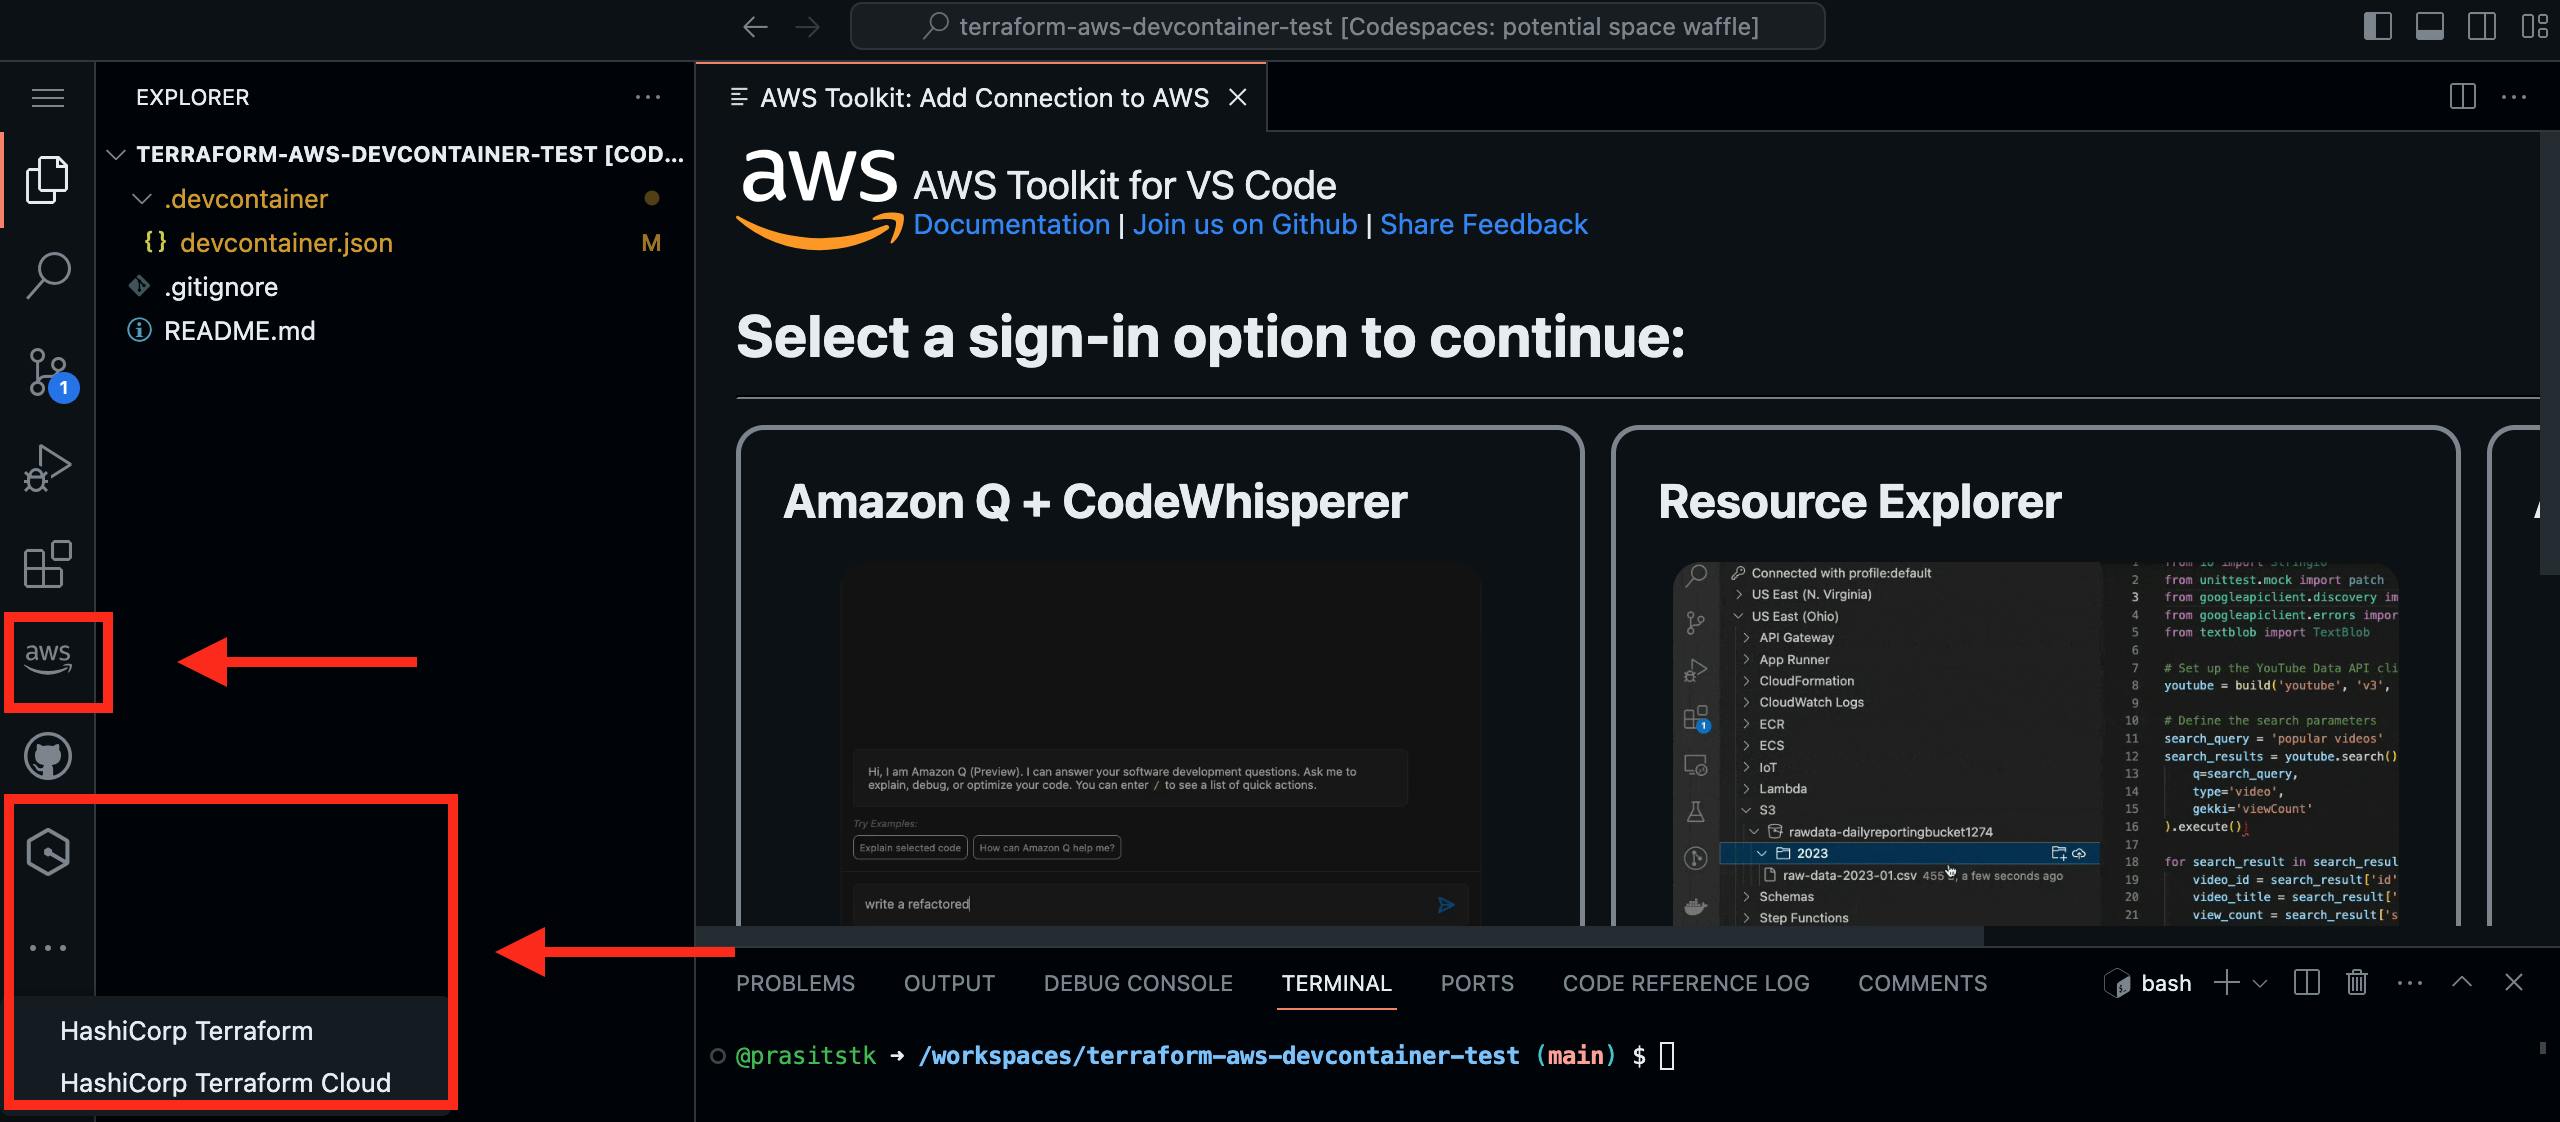
Once completed, the Terraform VS Code Extension will be installed automatically here:
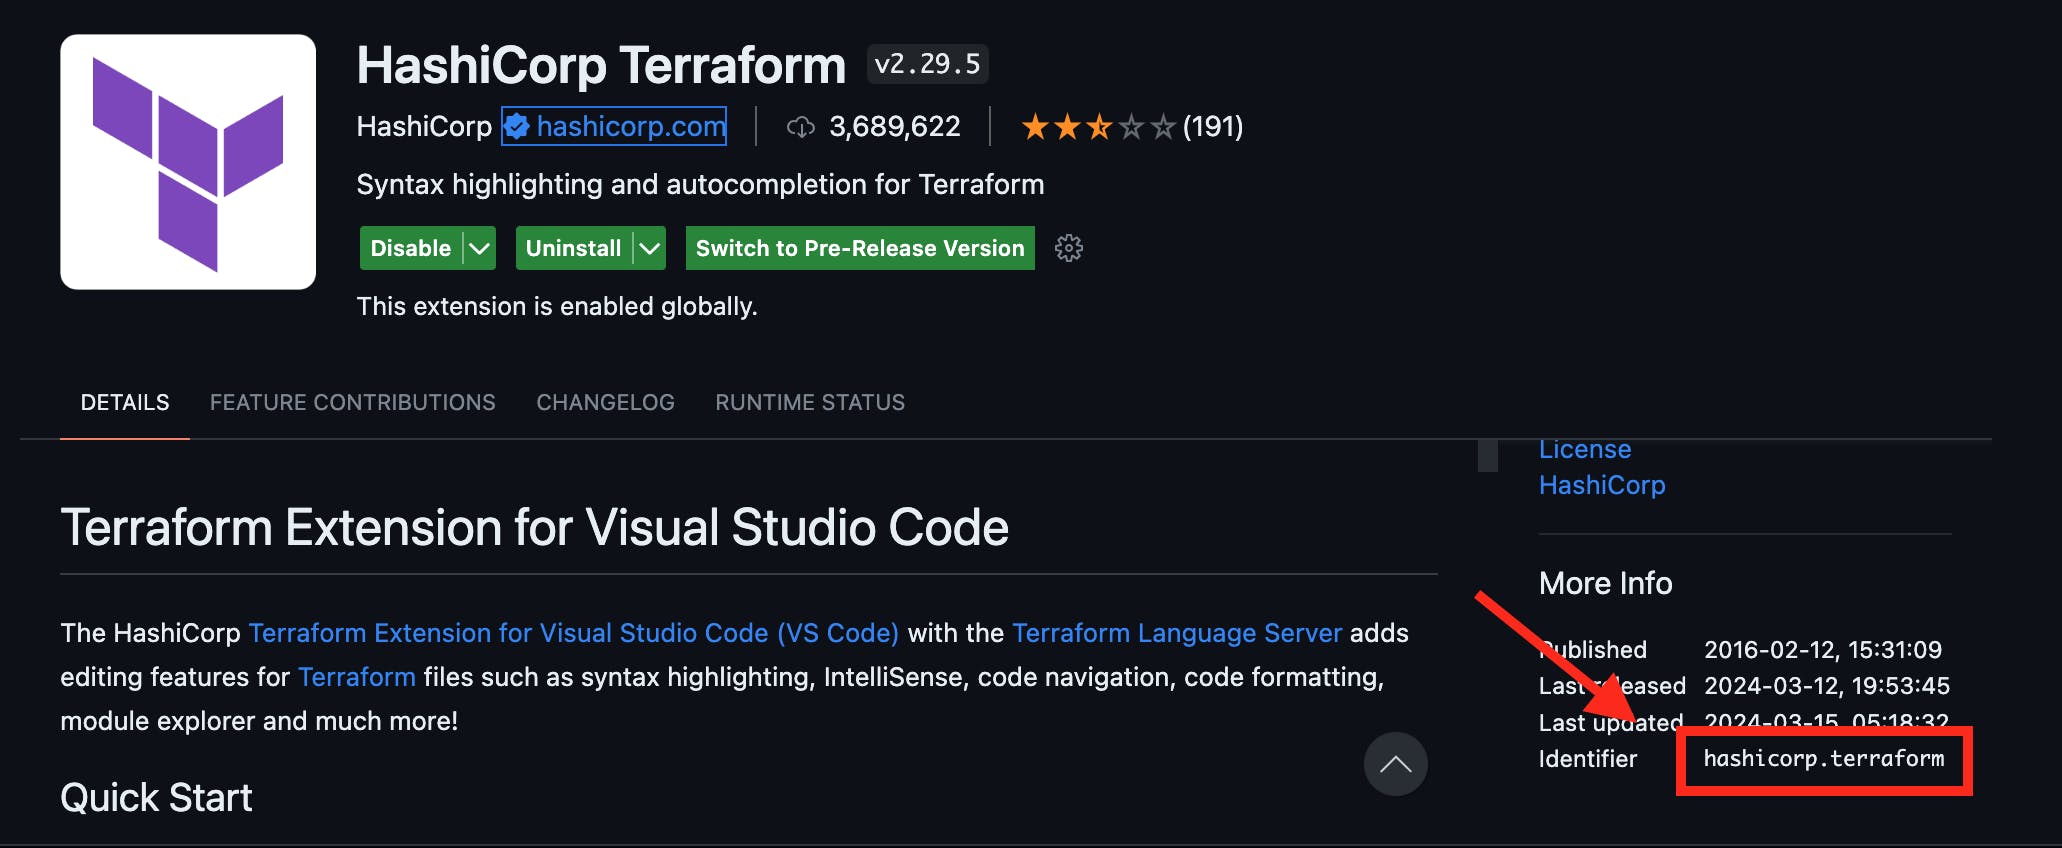
Note that to find the extension ID for inclusion in the "extensions" array, visit the extension's marketplace page. You can find this information under the "More Info" section:
Install AWS & Terraform CLIs on Dev Container 🛠
Method#1: "postCreateCommand" property of Dev container
You can add a new "postCreateCommand" property to the devcontainer.json file to run commands or scripts after the container is created. Start by creating a shell script file .devcontainer/post-create.sh to install AWS and Terraform CLIs:
#!/usr/bin/env bash

# Install Terraform CLI
wget -O- https://apt.releases.hashicorp.com/gpg | sudo gpg --dearmor -o /usr/share/keyrings/hashicorp-archive-keyring.gpg
echo "deb [signed-by=/usr/share/keyrings/hashicorp-archive-keyring.gpg] https://apt.releases.hashicorp.com $(lsb_release -cs) main" | sudo tee /etc/apt/sources.list.d/hashicorp.list
sudo apt update && sudo apt install terraform

# Install AWS CLI
curl "https://awscli.amazonaws.com/awscli-exe-linux-x86_64.zip" -o "awscliv2.zip"
unzip awscliv2.zip
sudo ./aws/install
rm -f awscliv2.zip
rm -rf aws
Next, include "postCreateCommand" in .devcontainer/devcontainer.json to execute the shell script after container setup automatically:
{
  "image": "mcr.microsoft.com/devcontainers/universal:2",
  "features": {
  },
  "secrets": {
    "AWS_ACCESS_KEY_ID": {
      "description": "AWS access key associated with an IAM user or role.",
      "documentationUrl": "https://docs.aws.amazon.com/cli/latest/userguide/cli-configure-envvars.html#envvars-list"
    },
    "AWS_SECRET_ACCESS_KEY": {
      "description": "the secret key associated with the access key (AWS_ACCESS_KEY_ID). This is essentially the password for that access key.",
      "documentationUrl": "https://docs.aws.amazon.com/cli/latest/userguide/cli-configure-envvars.html#envvars-list"
    }
  },
  "customizations": {
    "vscode": {
      "extensions": ["hashicorp.terraform"]
    }
  },
  // ADDED //
  "postCreateCommand": "bash .devcontainer/post-create.sh"
  ///////////
}
Once added, rebuild the container by clicking "Rebuild now" or selecting "Rebuild Container" from the menu.
Note that, in this method, after the codespace is rebuilt, you need to wait for a while until you see both awscliv2.zip file and aws/ directory are deleted. This can be inconvenient and I do not recommend this method. However, I would like to demonstrate this method to show you how to work with "postCreateCommand" on the Dev container configuration. Hopefully, it should be more useful for other use cases.
To verify installation, run aws --version and terraform -version commands:

With this setup, you can now utilize Terraform to manage AWS resources. Let's explore the second method by using Dev container features.
Method#2: Dev container features
Dev container offers a built-in method for adding additional software via the "features" property in the devcontainer.json file. This enables the installation of various tools to support your development, either from a predefined set of Features or custom ones. To make AWS and Terraform CLIs available, define features in the devcontainer.json file:
{
  "image": "mcr.microsoft.com/devcontainers/universal:2",
  // UPDATED //
  "features": {
    "ghcr.io/devcontainers/features/aws-cli:1": {},
    "ghcr.io/devcontainers/features/terraform:1": {}
  },
  /////////////
  "secrets": {
    "AWS_ACCESS_KEY_ID": {
      "description": "AWS access key associated with an IAM user or role.",
      "documentationUrl": "https://docs.aws.amazon.com/cli/latest/userguide/cli-configure-envvars.html#envvars-list"
    },
    "AWS_SECRET_ACCESS_KEY": {
      "description": "the secret key associated with the access key (AWS_ACCESS_KEY_ID). This is essentially the password for that access key.",
      "documentationUrl": "https://docs.aws.amazon.com/cli/latest/userguide/cli-configure-envvars.html#envvars-list"
    }
  },
  "customizations": {
    "vscode": {
      "extensions": ["hashicorp.terraform"]
    }
  }
}
Once added, rebuild the container by clicking "Rebuild now" or selecting "Rebuild Container" from the menu.
With this method, not only is software installed, but also VS Code extensions supporting the software. However, this can result in excessive extensions being installed, potentially consuming more memory or CPU than anticipated and impacting development efficiency. You can view all installed extensions as follows:
Again, to verify installation, run aws --version and terraform -version commands:

This setup also allows you to utilize Terraform for managing AWS resources. Now, let's explore the third method, which I recommend 😉.
Method#3: Custom Dockerfile [Recommended 👍]
Instead of starting with an existing image, this method involves creating a custom image using a Dockerfile. This file extends the image by executing additional shell commands to install AWS and Terraform CLIs during the container image building process. First, create a Dockerfile in the .devcontainer directory:
FROM mcr.microsoft.com/devcontainers/universal:2

# Install Terraform CLI
RUN wget -O- https://apt.releases.hashicorp.com/gpg | sudo gpg --dearmor -o /usr/share/keyrings/hashicorp-archive-keyring.gpg \
    && echo "deb [signed-by=/usr/share/keyrings/hashicorp-archive-keyring.gpg] https://apt.releases.hashicorp.com $(lsb_release -cs) main" | sudo tee /etc/apt/sources.list.d/hashicorp.list \
    && sudo apt update && sudo apt install terraform

# Install AWS CLI
RUN curl "https://awscli.amazonaws.com/awscli-exe-linux-x86_64.zip" -o "awscliv2.zip" \
    && unzip awscliv2.zip \
    && sudo ./aws/install \
    && rm -f awscliv2.zip \
    && rm -rf aws
In the devcontainer.json file, replace "image" property with "build" property:
{
  // REPLACE //
  //"image": "mcr.microsoft.com/devcontainers/universal:2",
  "build": {
    "dockerfile": "Dockerfile"
  },
  /////////////
  "features": {
  },
  "secrets": {
    "AWS_ACCESS_KEY_ID": {
      "description": "AWS access key associated with an IAM user or role.",
      "documentationUrl": "https://docs.aws.amazon.com/cli/latest/userguide/cli-configure-envvars.html#envvars-list"
    },
    "AWS_SECRET_ACCESS_KEY": {
      "description": "the secret key associated with the access key (AWS_ACCESS_KEY_ID). This is essentially the password for that access key.",
      "documentationUrl": "https://docs.aws.amazon.com/cli/latest/userguide/cli-configure-envvars.html#envvars-list"
    }
  },
  "customizations": {
    "vscode": {
      "extensions": ["hashicorp.terraform"]
    }
  }
}
Rebuild the container by clicking "Rebuild now" or selecting "Rebuild Container" from the menu.
Again, to verify installation, run aws --version and terraform -version commands:
This method enables you to utilize Terraform for managing AWS resources efficiently. I recommend this method for the following reasons:
Unlike Method #1, there is no need for a wait time after the container is running, as AWS and Terraform CLIs are already installed in the custom image.
Unlike Method #2, no excessive extensions are installed, ensuring a streamlined development environment.
Bonus: Make the selected method a GitHub template 🎁
After choosing your preferred method, it's time to commit changes:
git add .
git commit -m "Add Dev container configuration"
git push origin main
Now, anyone wanting to create a new codespace from your Terraform-AWS repository won't need to manually set up everything. They can simply click to create it from your repository, and voilà! Everything they need is ready!
Alternatively, if you plan to create multiple Terraform-AWS repositories for future projects, you can make your repository a template:
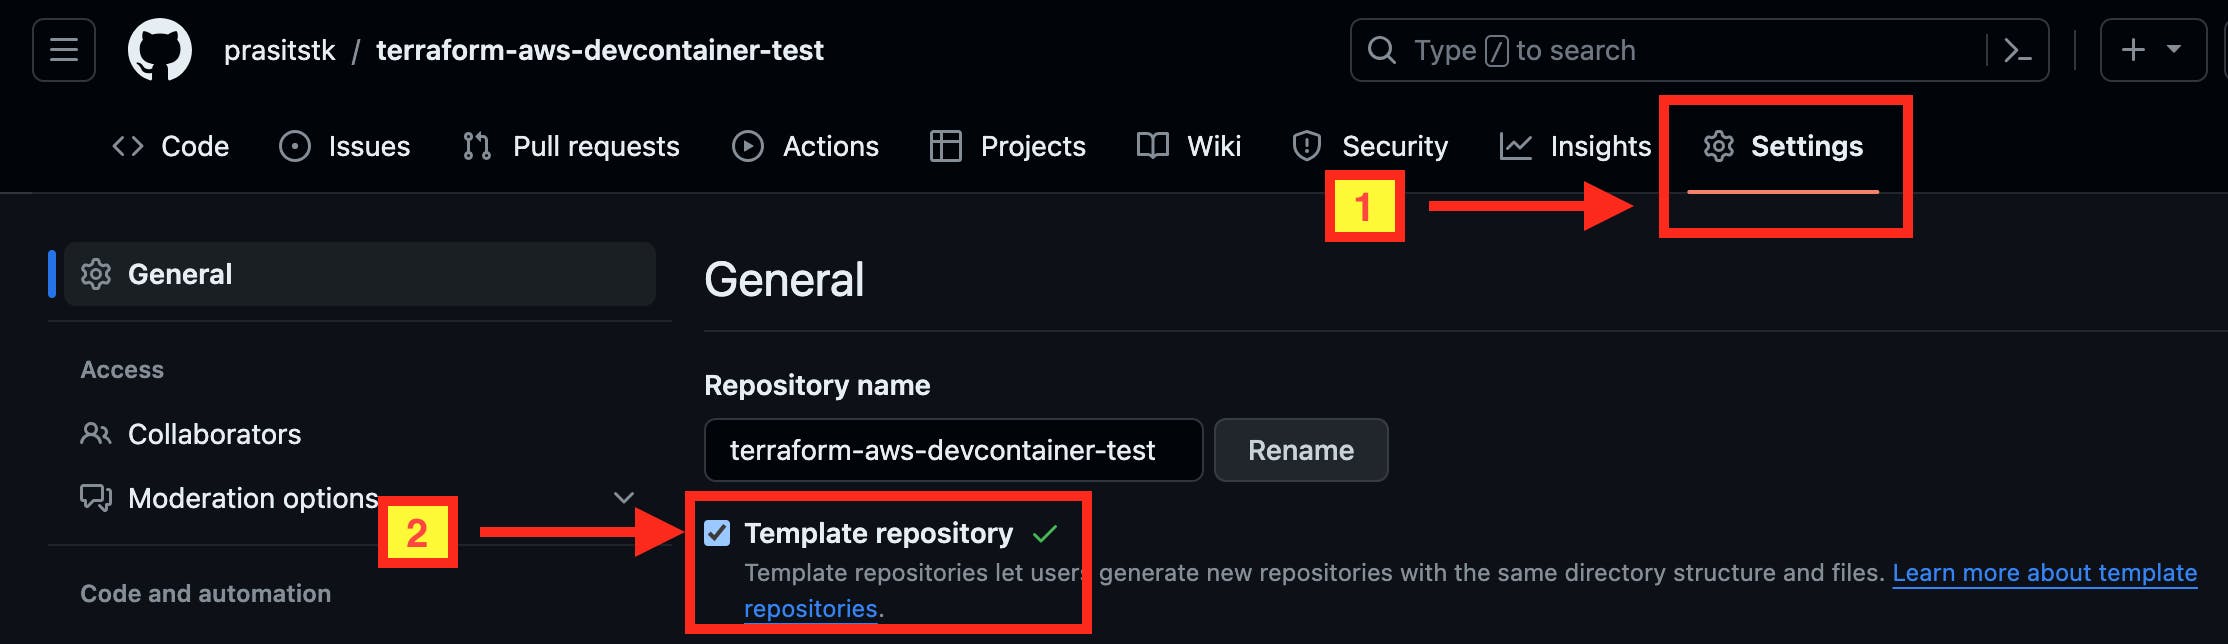
Navigate to the main page of the repository.
Under your repository name, click "Settings" tab.
Select "Template repository".
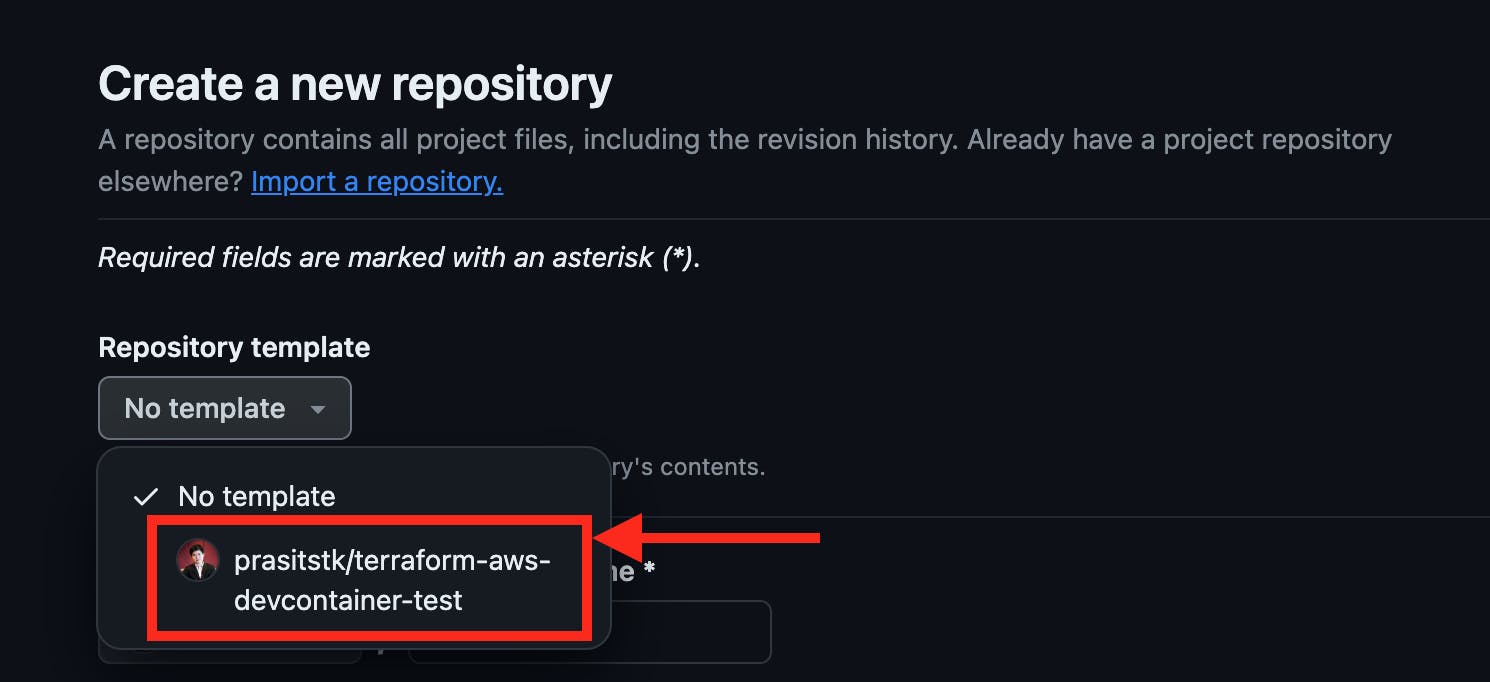
Now, every time you create a new repository, you can use this repository as a template:
Conclusion 🏁
Congratulations! 🎉 You now have your Dev container configuration for your Codespace setup without any manual tasks. What's even better is that you also have your pre-defined template for your future Terraform-AWS projects. I hope you find this post useful for your work and enjoy joining me on my upcoming blog posts! 😎