

Copy/Sync data between two S3 buckets with Terraform
Simplify Your Data Migration: Copying or Syncing Between S3 Buckets Made Easy with Terraform


Last week, a friend asked me how to easily copy files from one AWS account to another. After some searching, I found a helpful pattern from AWS (here) that explains the steps. I think it's a common task that many AWS users might need to do. So, I decided to create a simple way to do it using Terraform to create AWS resources for this task. I've shared my solution on GitHub in case it can help others too (here).
In this blog post, I'll walk you through the process and show you how to use my Terraform code from my solution to simplify the resource definition for this task.
Let's get started and simplify data migration! 🚀
Architecture 🕍
The objective of this AWS pattern is to create multi-account resources that allow us to migrate objects or files from an Amazon S3 bucket in an AWS account to another S3 bucket in a different account or region. Let's see the architecture of this pattern:
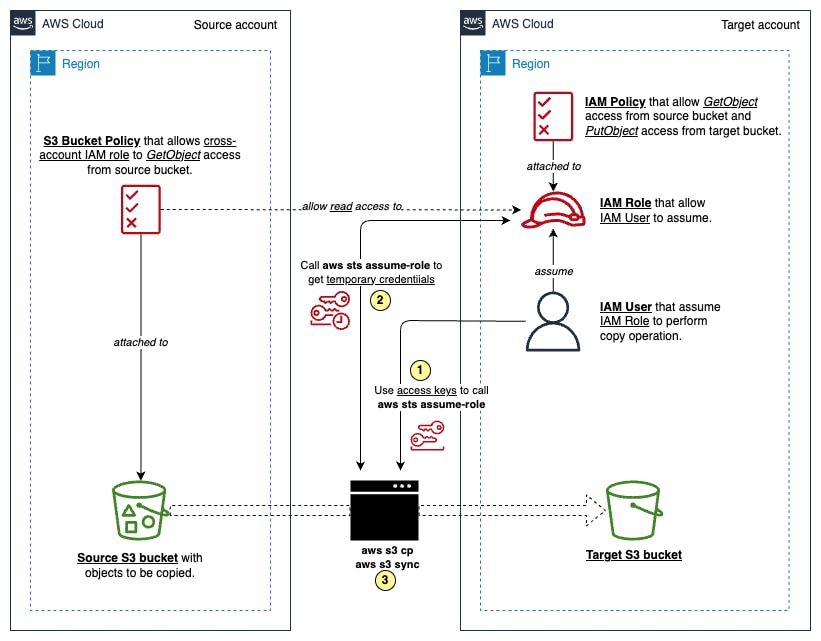
The source S3 bucket allows GetObject permission through an attached resource policy, typically a S3 Bucket Policy.
In the target account, an IAM user (temp-user) needs to assume an IAM role granting PutObject permission for the target S3 bucket and GetObject permission for the source S3 bucket.
Finally, execute copy or sync commands on behalf of temp-user to transfer data from the source S3 bucket to the target S3 bucket.
Prerequisites 📋
There are a few things we need before we demonstrate how to utilize my Terraform code to support copying or syncing S3 objects across accounts:
An active source AWS account with an IAM user (assuming named as src-tf-developer) that has required permissions to create/update/delete resources by Terraform CLI.
An active target AWS account with an IAM user (assuming named as tgt-tf-developer) that has required permissions to create/update/delete resources by Terraform CLI.
Access keys of those IAM Users from both accounts above.
An S3 bucket of the source AWS account in a particular region with some objects to be copied.
An empty S3 bucket of the target AWS account in a particular region.
Terraform (version >= 0.13)
Terraform Environment Setup 🛠️
I will demonstrate how to set up the environment for our Terraform project based on my repository here. First, navigate to my repository, click "Code" button and click "Create codespace on main" to start your own codespace on this repository:

After the codespace initializes successfully, create terraform.tfvars (ignored from. git) on the root directory of the project to define variables for Terraform as follows:
# Source AWS account configuration
# - Source AWS account region code: "ap-southeast-1" (= Singapore), for example.
# - AWS access key ID and secret key of src-tf-developer in the source account.
# - Source S3 bucket name, "src-bucket.prasitio.com", for example.
src_aws_region     = "<source-aws-account-region>"
src_aws_access_key = "<source-aws-account-access-key>"
src_aws_secret_key = "<source-aws-account-secret-key>"
src_s3_bucket_name = "<source-aws-s3-bucket-name>"

# Target AWS account configuration
# - Target AWS account region code: "ap-southeast-1" (= Singapore), for example.
# - AWS access key ID and secret key of tgt-tf-developer in the target account.
# - Target S3 bucket name, "tgt-bucket.prasitio.com", for example.
tgt_aws_region     = "<target-aws-account-region>"
tgt_aws_access_key = "<target-aws-account-access-key>"
tgt_aws_secret_key = "<target-aws-account-secret-key>"
tgt_s3_bucket_name = "<target-aws-s3-bucket-name>"
NOTE: This repository configure devcontainer to make AWS CLI, Terraform CLI, and necessary VS Code extensions available to be used. So, no need to install all of them again.
Infrastructure Deployment 🏗️
Initialize the Terraform project on the current working directory and download/install AWS provider by:
terraform init
Then, run the following command to create an execution plan and write it into a temporary folder. This will let you preview the infrastructure changes that Terraform plans to make to your infrastructure before applying the actual changes:
terraform plan -out /tmp/tfplan
Run the following command to apply the actual infrastructure changes based on the exported plan from the previous step onto both source and target AWS accounts:
terraform apply /tmp/tfplan
Note that by default terraform apply will automatically create a state file called terraform.tfstate which contains information about all resources created or modified by Terraform. It is actually not a best practice to keep the state file locally when you collaborate with others to work with the same Terraform project. In the future blog post, I will write about the best practice to keep the Terraform state file remotely on S3 bucket. Stay tune!
Explanation 💬
Before we perform the copy or sync task from the source S3 objects, let me explain more about what are inside my Terraform project, what resources Terraform creates and refers to, and why they are needed for our task.
Providers
Terraform relies on plugins called providers to interact with cloud providers, here is AWS. In this project, I declare AWS provider to be installed in providers.tf:
terraform {
  required_providers {
    aws = {
      source  = "hashicorp/aws"
      version = "~> 5.0"
    }
  }
}
In providers.tf, from the installed AWS provider, I also configure multiple settings for each source and target AWS accounts separately. I use the alias meta-argument to provide an extra name for each configuration. The data source and resource blocks needs to refer to these aliases by using provider = aws.<alias> to differentiate the destination of the AWS account that those blocks are working on. Here are the provider configurations for each account in the providers.tf:
provider "aws" {
  alias      = "source"
  region     = var.src_aws_region
  access_key = var.src_aws_access_key
  secret_key = var.src_aws_secret_key
}

provider "aws" {
  alias      = "target"
  region     = var.tgt_aws_region
  access_key = var.tgt_aws_access_key
  secret_key = var.tgt_aws_secret_key
}
Input variables
Terraform input variables are used to assign dynamic values to resource attributes in a Terraform module. With Input variables, you can customize modules without altering your Terraform code.
In my project, I define the input variables of the root module in variables.tf file and assign their value in terraform.tfvars as I mentioned in the previous section. Here is how variables are defined:
variable "src_aws_region" {
  type        = string
  description = "AWS Region of your source AWS account"
}

variable "src_aws_access_key" {
  type        = string
  description = "AWS Access Key of your source AWS account"
}

variable "src_aws_secret_key" {
  type        = string
  description = "AWS Secret Key of your source AWS account"
}

variable "src_s3_bucket_name" {
  type        = string
  description = "S3 bucket name of your source AWS account"
}

variable "tgt_aws_region" {
  type        = string
  description = "AWS Region of your target AWS account"
}

variable "tgt_aws_access_key" {
  type        = string
  description = "AWS Access Key of your target AWS account"
}

variable "tgt_aws_secret_key" {
  type        = string
  description = "AWS Secret Key of your target AWS account"
}

variable "tgt_s3_bucket_name" {
  type        = string
  description = "S3 bucket name of your target AWS account"
}
NOTE: Terraform variables can be other data types rather than string. You can find more information here.
Data sources
Data sources provide information about entities that are not managed by the current Terraform configuration. In this project, our data sources are source and target S3 buckets because I try to simulate the general problem of copying and syncing S3 objects across existing S3 buckets, not the new ones. Later, by using this Terraform project defined in main.tf, we can create new resources that associate with both S3 buckets to support only for copying and syncing S3 objects operation.
Here is how we define those data sources in data.tf:
###############
# Datasources #
###############

#----------------#
# Source account #
#----------------#

data "aws_s3_bucket" "src_s3_bucket" {
  provider = aws.source
  bucket   = var.src_s3_bucket_name
}

#----------------#
# Target account #
#----------------#

data "aws_s3_bucket" "tgt_s3_bucket" {
  provider = aws.target
  bucket   = var.tgt_s3_bucket_name
}
The data block is to define how we query a data of a particular resource in a cloud provider. You can see more about how to get information about AWS S3 Bucket from a particular account here.
Resources
As I mentioned before, main.tf is a file that define all of the AWS resources to be created on both source and target AWS accounts only for copying and syncing S3 objects operation. All of them are security resources that limit permissions of AWS CLI to do only those tasks. The below section will describe each resource:
Source account :: S3 Bucket Policy
resource "aws_s3_bucket_policy" "app_bucket_policy" {
  provider = aws.source
  bucket   = data.aws_s3_bucket.src_s3_bucket.id

  policy = jsonencode({
    Version = "2012-10-17"
    Statement = [
      {
        "Sid" : "DelegateS3Access",
        "Effect" : "Allow",
        "Principal" : {
          "AWS" : aws_iam_role.s3_migration_role.arn
        },
        "Action" : [
          "s3:ListBucket",
          "s3:GetObject",
          "s3:GetObjectTagging",
          "s3:GetObjectVersion",
          "s3:GetObjectVersionTagging"
        ],
        "Resource" : [
          "arn:aws:s3:::${data.aws_s3_bucket.src_s3_bucket.id}/*",
          "arn:aws:s3:::${data.aws_s3_bucket.src_s3_bucket.id}"
        ]
      }
    ]
  })
}
This resource block defines a S3 Bucket Policy to be attached to the source S3 bucket on the source AWS account. The policy allows the IAM Role aws_iam_role.s3_migration_role from the target account to get S3 objects from the source bucket.
Target account :: IAM User
resource "aws_iam_user" "temp_user" {
  provider = aws.target
  name     = "temp-user"
  path     = "/"
}

resource "aws_iam_access_key" "temp_user_access_key" {
  provider = aws.target
  user     = aws_iam_user.temp_user.name
}
The first resource block defines an IAM User on the target account named temp-user. Another resource block will generate temp-user's access key ID and secret key to be used on AWS CLI to perform copy or sync task later.
Target account :: IAM Policy
resource "aws_iam_policy" "s3_migration_policy" {
  provider = aws.target
  name     = "S3MigrationPolicy"

  policy = jsonencode({
    Version = "2012-10-17"
    Statement = [
      {
        "Effect" : "Allow",
        "Action" : [
          "s3:ListBucket",
          "s3:GetObject",
          "s3:GetObjectTagging",
          "s3:GetObjectVersion",
          "s3:GetObjectVersionTagging"
        ],
        "Resource" : [
          "arn:aws:s3:::${data.aws_s3_bucket.src_s3_bucket.id}",
          "arn:aws:s3:::${data.aws_s3_bucket.src_s3_bucket.id}/*"
        ]
      },
      {
        "Effect" : "Allow",
        "Action" : [
          "s3:ListBucket",
          "s3:PutObject",
          "s3:PutObjectAcl",
          "s3:PutObjectTagging",
          "s3:GetObjectTagging",
          "s3:GetObjectVersion",
          "s3:GetObjectVersionTagging"
        ],
        "Resource" : [
          "arn:aws:s3:::${data.aws_s3_bucket.tgt_s3_bucket.id}",
          "arn:aws:s3:::${data.aws_s3_bucket.tgt_s3_bucket.id}/*"
        ]
      }
    ]
  })
}
This resource block defines the IAM Policy S3MigrationPolicy that allow any attaching principals to get S3 objects from the source S3 bucket and put S3 objects to the target S3 bucket. For our task, we attach it to the IAM Role S3MigrationRole defined below.
Target account :: IAM Role
resource "aws_iam_role" "s3_migration_role" {
  provider = aws.target
  name     = "S3MigrationRole"
  path     = "/"

  assume_role_policy = jsonencode({
    Version = "2012-10-17"
    Statement = [
      {
        "Sid" : "AllowTempUserToAssumeRole",
        "Effect" : "Allow",
        "Principal" : {
          "AWS" : aws_iam_user.temp_user.arn
        },
        "Action" : "sts:AssumeRole"
      }
    ]
  })

  managed_policy_arns = [
    aws_iam_policy.s3_migration_policy.arn
  ]
}
The last resource block defines an IAM Role S3MigrationRole attaching the IAM Policy S3MigrationPolicy to allow only temp-user to assume to the role to perform copy or sync operation by AWS CLI.
Outputs
In the last file of our Terraform setup, outputs.tf, we define output variables to display crucial information in the console after successful applying the root module. These outputs are specifically tailored for the copy or sync tasks executed through the AWS CLI:
output "tgt_temp_user_access_key_id" {
  value = aws_iam_access_key.temp_user_access_key.id
}

output "tgt_temp_user_access_key_secret" {
  value = aws_iam_access_key.temp_user_access_key.secret
  sensitive = true
}

output "tgt_s3_migration_role_arn" {
  value = aws_iam_role.s3_migration_role.arn
}

output "src_aws_region" {
  value = var.src_aws_region
}

output "src_s3_bucket_name" {
  value = data.aws_s3_bucket.src_s3_bucket.id
}

output "tgt_aws_region" {
  value = var.tgt_aws_region
}

output "tgt_s3_bucket_name" {
  value = data.aws_s3_bucket.tgt_s3_bucket.id
}
You can see the sensitive = true attribute for the tgt_temp_user_access_key_secret output. This is important because Terraform considers this generated secret key as sensitive data. Terraform requires us to confirm our intent to display it in the console by forcing us to add sensitive = true for this output block; otherwise, the following error will occur:

To view all outputs, you can use the command terraform output:

Although tgt_temp_user_access_key_secret remains masked, you can explicitly display sensitive data like this by running terraform output tgt_temp_user_access_key_secret.
For the next steps, most commands will rely on the terraform output <output-variable-name> command to assign each output variable to its corresponding environment variable. We also use the -raw flag to print values in a format suitable for assigning environment variables, without quotes or a newline character.
Copy or Sync 🔄
Run the following commands to set up environment variables for AWS CLI with AWS access keys of the newly created temp-user IAM User of the target account:
# Set up AWS access keys of temp-user
export AWS_ACCESS_KEY_ID=$(terraform output -raw tgt_temp_user_access_key_id)
export AWS_SECRET_ACCESS_KEY=$(terraform output -raw tgt_temp_user_access_key_secret)
Assume S3MigrationRole by temp-user and replace environment variables for AWS CLI with the newly received temporary access keys from aws sts assume-role command:
# Assume S3MigrationRole by temp-user and set up temporary access keys
export TARGET_S3_MIGRATION_ROLE_ARN=$(terraform output -raw tgt_s3_migration_role_arn)
export $(printf "AWS_ACCESS_KEY_ID=%s AWS_SECRET_ACCESS_KEY=%s AWS_SESSION_TOKEN=%s"  \
  $(aws sts assume-role \
    --role-arn "$TARGET_S3_MIGRATION_ROLE_ARN" \
    --role-session-name AWSCLI-Session \
    --query "Credentials.[AccessKeyId,SecretAccessKey,SessionToken]" \
    --output text))
Verify that currently AWS CLI actually assumes the S3MigrationRole role by:
aws sts get-caller-identity
Before running copy or sync command, set up the following variables:
export SRC_BUCKET_NAME=$(terraform output -raw src_s3_bucket_name)
export SRC_REGION=$(terraform output -raw src_aws_region)
export TGT_BUCKET_NAME=$(terraform output -raw tgt_s3_bucket_name)
export TGT_REGION=$(terraform output -raw tgt_aws_region)
Run the following command to copy all objects from a folder in the source S3 bucket into another folder on the target S3 bucket:
aws s3 cp s3://$SRC_BUCKET_NAME/src-folder-path/ \
  s3://$TGT_BUCKET_NAME/tgt-folder-path/ \
  --recursive --source-region $SRC_REGION --region $TGT_REGION
Check whether all of the objects on a specified folder are copied into the target S3 bucket folder path.
Or, you can sync all of the objects in the source S3 bucket with the target S3 bucket:
aws s3 sync "s3://$SRC_BUCKET_NAME/" \
  "s3://$TGT_BUCKET_NAME/" \
  --source-region $SRC_REGION --region $TGT_REGION
Then, verify whether all objects from the source S3 bucket are copied into the target S3 bucket.
Clean Up 🧹
To clean up the whole infrastructure by deleting all of the resources from both source and target AWS accounts, excluding the source and target S3 bucket and their objects inside, run the following command:
terraform destroy
If -auto-approve is set, then the destroy confirmation will not be shown:
terraform destroy -auto-approve
Conclusion 🏁
This blog post shows an easy way to copy or sync data between AWS S3 buckets across accounts using Terraform. I've outlined the necessary steps, from setting up prerequisites to executing the migration task. With Terraform, it's simple to manage the necessary parts. By using AWS CLI and Terraform outputs, you can smoothly copy or sync your data. Following cleanup steps is also important to keep things tidy and save costs.
By following this guide, you can automate S3 data migration, reducing manual work and error risks. Terraform's declarative approach allows easy adaptation and scaling to fit your needs, giving you the power to manage data migration tasks smoothly across your AWS setups.
Stay tuned for more helpful tips in our next blog post! 😎
References 🔗
Main Resources
AWS
Amazon S3 bucket policies and user policies (Amazon S3 documentation)
IAM identities (users, groups, and roles) (IAM documentation)